Sunday, April 15, 2018

Finally fleece

Two years ago (maybe 3, who's counting?) I was able to get a proxy shopper to select a fleece for me.  I listed the breeds I was interested in, and we agreed we would actually split something.  She picked out this ribbon winning cormo/rambouillet brown fleece that is honestly just amazing.  Tight crimp, ultra soft, exactly what I had hoped for.  I even had managed to barter for a pair of mini combs.  


(Pictures of some sorted locks from the fleece)


Between the move, getting caught up on life, struggling more with autoimmune flareups in the white north, and let's face it, anxiety over ruining an expensive and beautiful fleece, it sat.  It sat covered in lanolin, in a bag, becoming naturally very stuck to itself.  

At Rhinebeck last year, I so very nearly bought a natural/white colored cormo fleece, and talked myself out of it, partially because we had no space in the van coming home, but also because I felt guilty.  I hadn't processed this one yet.  What business did I have shopping for another one?

I promised myself, since we had decided to scout out Maryland Sheep and Wool festival, that I'd get one then, if and only if I had processed "the fleece".  I'd had two partial targhee fleeces in Oregon, and learned some from them, but honestly not enough to feel comfortable with the luxury fleeces I really wanted to work with.  Only one way to really learn though.

At some point I bought a copy of a "learning to comb wool" DVD, and watched the part on 2 pitch combs and technique.  I watched youtube videos on viking combs.  I read tons of wash recipes, re-read through the fleece thread in Sweets off the Wheel, researched wool washes, and washed up some samples.


I pinned them in a mesh bag and washed with a drop or two of Unicorn Beyond Clean (the unscented version of Power Scour).   They came out a little fuzzy but overall, locks were intact and the grease was shockingly well removed.  I'm not remotely a fan of spinning from grease and these were almost dry enough to be a challenge to comb.

(washed locks)

The combs I have are Louet minis and overall I felt like they were doing the job pretty well, but a few neps were managing to find their way through despite my best efforts.  I chalked it up to newness (and that might be part) but twice in the last week, I've seen mention of cormo and cormo crosses requiring extra fine combs.  I'm going to keep going with my minis for now, but I'm absolutely shopping for some extra fines, hopefully at MDSW.   For now, I'm inching along, one small basket is full of combed nests that are almost, but not quite, nep-free.


Friday, March 23, 2018

Supernova, and new-to-me fibers

The Great Competition of (babywearing) Weavers

The most exciting/nerve-wracking event of the year.  How to be noticed, but be anonymous... well this year I did REALLY WELL on the second half.

The process was really organic this year - I churned through a couple ideas.  Seasons (obvious, too obvious, which is why I discarded it quickly even though I love it).  Cerridwen the enchantress - I almost did this one, and got really into the development of the idea, but when I set my mind and heart on parallel threading and network treadle to mimic feathers, I knew I'd run into issues with the deadline.

Something triggered a memory of an old colorway I'd done on wool, based on Kepler's supernova.  It immediately struck me, what could be MORE of a change, than a supernova?  They're stunningly beautiful, a bit sad, but universe changing.

(photo of Kepler's supernova courtesy of Google images)


I considered black warp with handspun weft but the issue of anonymity was a huge problem, being one of very few weavers who makes handspun baby wraps to begin with, and add on to that the already problematic time frame.

Until this I'd never done a *baby wrap warp* out of anything but cotton.  I've done scarves, shawls, etc out of other materials but always cotton for baby wraps.  So I knew I needed something not cotton.  I settled on rose viscose from Saltwater Rose Threads in the UK, and then decided I wanted something that would take a neon color (splashes of neon pink to be precise) for the weft.  I ended up discussing with the owner of Saltwater Rose to try to get a good idea of the yarn weight and balance, and decided on her silk bourette.  It came from the UK to UP Michigan in less than a week!

Again because of time, I did a pretty short warp.  I wound it using my warping reel Carl built, and measured it in just 3 chains in the span of an hour or two.  I wound a mini skein to see how the rose would take color (to make sure I could get rich, dark colors) and was amazed at how quickly it absorbed water, and dye struck within a matter of an hour or less. Win!

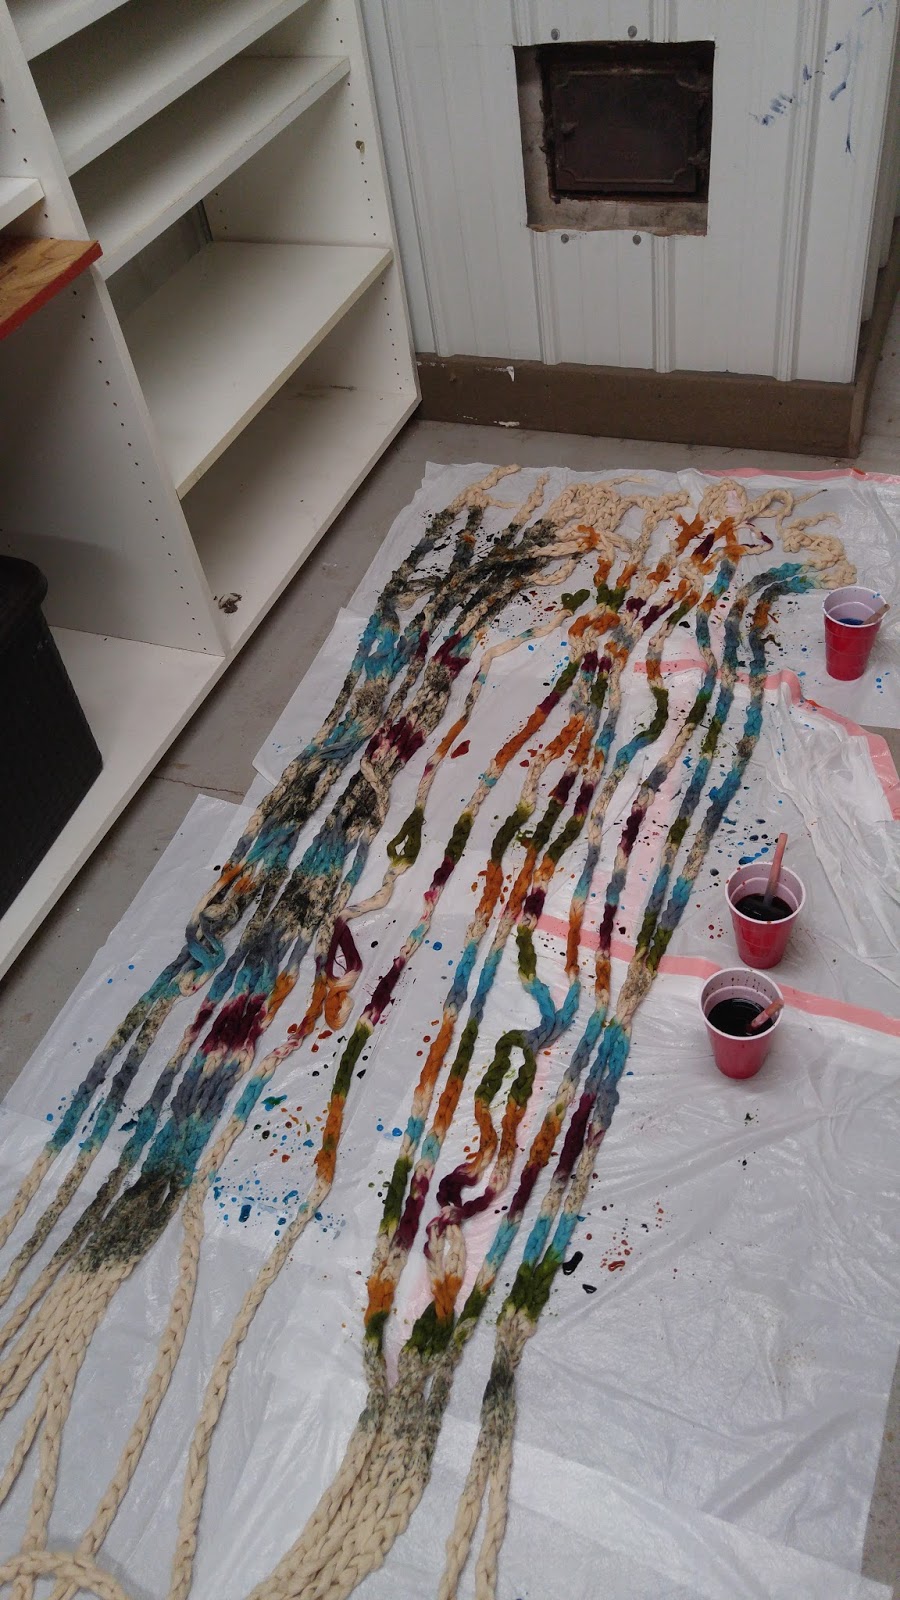
I did soak the actual warp overnight.  I went back and forth so many times about snow dyeing it, but just couldn't figure out a place in the house where we could spread the warp, and it would freeze in the garage.  Instead, I laid it out, unchained, and swirled in supernovas with dye.

After the initial color swirls, I went back and filled in the dark space with navy, deep purples, and rich blues. I used I believe 22 dye colors all in all.

I carefully chained it and kept it chained for rinsing and drying.

I was told that the Lilla was "built" for back to front warping so I went with it again.  It was basically a mess.  Rose is a bit like warping rubber bands.  It just stretched and stretched and then bounced back and tangled in itself more, strumming was a mess.  I think sectional it might have been ok, if it had never lost tension, but beaming was probably the longest step of the whole process for me.
Slowly though, I got it on.  (And that's the last warp I've beamed back to front since! Made for it or not, the Lilla warps just FINE front to back!)

I chose three weft options, not really knowing what I'd submit until I saw the yarn on the warp, but I had a good idea that I'd proceed with the bourette for one of the pieces anyways.

The bourette I dyed for pooling, and used different degrees of fluorescent dye to achieve a blacklight glow as well as "rings" on the weft - to mimic the circular pattern of a supernova of course.

Then I dyed up a muted silk/nettle option
Both had variation between skeins of how much "accent color" was on each skein.  I also then dip dyed a sparkly merino/silk/stellina (which I ended up not using because it was too dominant to show the warp)


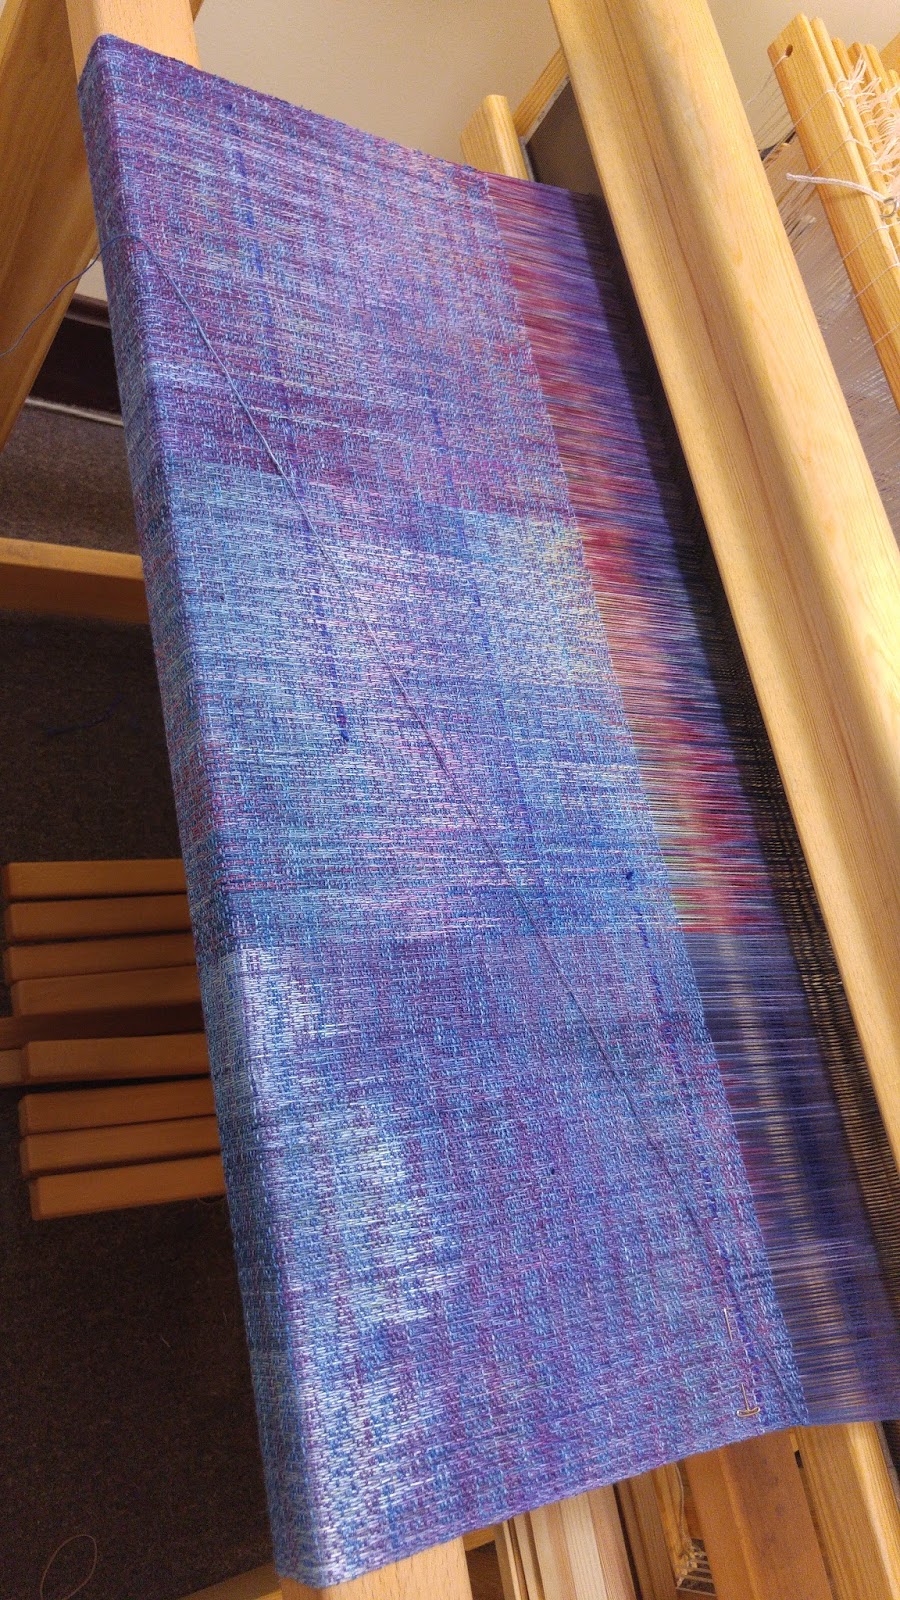
The pooling rings of the fluorescent bourette silk.
This is the one I ended up submitting.  While I worked on it for some reason, I kept thinking of Doctor Who, Doomsday.  It was not in my mind when the project started, but I couldn't shake it.  David Tennant, he was whispering in my ear as I wove, I swear it.  "I'm burning up a sun, just to say goodbye."  Aaaah Ten, he gets me every time.

And so my chameleon warp became "Burning Up a Sun", an unintentional but fitting tribute.  Ultimately it was the most interesting piece I'd woven to date.  The structure was complex and a long treadle pattern.  As you moved away, it became blue/purple dominant, but closer, the bursts of color emerged and almost had rainbow explosions where each painted supernova was.  (See the bottom right corner of the collage compared to the outdoor pictures).  And of course the blacklight reaction changed it further.  The bourette was grippy, but soft.  The rose was shiny but bouncy and lofty in an almost wool type of way.  Paradoxical.

The sister was far more introspective.  It was a reflecting pool.  It was deep and flowing.  It was internal and dark.  I just called it "Reflections" and put in random handspun silk blessing threads/inlays scattered throughout.

The silk/nettle made this piece all luxury and drape.  Again, close up the bursts of color would emerge, but the piece as a whole was just a bit more quiet and elegant.

In my race against the clock, I ended up cutting off with a single day to spare.  And February would end up being a mental break for me, having woven something like 50 yards over the previous 5 weeks.

Sunday, February 18, 2018

Of competitions, deadlines, and dye shenanigans

Regulations on baby wraps officially went into effect on Jan 30, and there was a huge rush within the community for everyone to squeeze in some last fancy fiber combinations.  (Short version is every fiber combination must be retested, and a full size sample has to be submitted and returns cut/unsellable.  All the fancy fibers that aren't going off to the labs had to be done prior to Jan 30.)

Everyone in the community had hoped Loom to Wrap would host a final Great Competition of Weavers before regulations, but as time ticked closer and there was no sign of one, it looked unlikely.  I planned to do my last handspun piece, copper patina, and then work on pieces we would test for the labs.

Someone suggested an unofficial competition based on geeky fandom characters, and after some flip flopping amongst strong female characters, I decided on Briene of Tarth from Game of Thrones.  A friend said she was going to do Tormund, and there was giggling and planning and things were coming together.  Testers got nudged back.


Then suddenly, Loom to Wrap announced a "quick" competition, to finish up 2 weeks before regulations.  Everyone had very short notice and most of us were plotting lab testers, if not also the character showcase.  Panic.

Loom to Wrap's visibility is huge - and wraps seen there give a huge marketing advantage to anyone who participates.  The hype is immeasurable for these competitions, not even for the winner but just because everyone outdoes themselves and uses it as a chance to go outside their personal box.

It wasn't a matter of IF I would participate, it was how.  My friend delayed Tormund, and I didn't feel right doing Briene without her.  So I thought, planned, considered bumping up my Dark Crystal wrap, but it didn't feel right to do a single character.  Then I realized.

My kids.  Their movie.  2 sons of Adam, 2 daughters of Eve.  I needed to travel to Narnia for the character showcase.  But... how to make it fit in my time constraints?

I split the warp for Copper patina.  I dyed two thirds of it as I'd planned, in coppers, greens, blues, and browns.  The other third I dyed totally differently.  I speckle dyed forest greens to make it look like pine trees peeking through snow.  I streaked burgandy and gold for Lucy and Tumnus.  Tiny pops of blue for ice. 


I ended up playing with a 6 shaft crackle, and switched out the treadling only.  They looked so different I didn't think anyone would be able to peg me based on design similarity. 


  The blue highlighted was the Narnian "icicle" pattern,  while copper patina was done in the below version.  Both used 6 shafts and had a plainweave selvedge.

As woven, you can see the transition between the dyework on copper patina (towards the camera) and Spare Oom in the back.

I was skeptical but would absolutely have not finished in time had this not worked, and the piece was exactly as I'd envisioned!


Tuesday, January 23, 2018

Countermarche success, finally!

Ah Lilla, why couldn't you have been my first countermarche experience?

After all of my Bergman struggles I had so much anxiety about getting this loom going.  Compounded of course by the advice that I really should warp it back to front.  I loathe back to front without a sectional, I get extra tangles and it's slower and just. Ugh. But I figured I would try, since ergonomically, this definitely is not meant for front to back.  It just isn't. 

So after spending about 4 times longer than I should have getting the warp on, I was ready for tie ups.  (Cringe).  Tarah had to remind me which way they go (upper lamms in front of the lower!) and I have to say, anchor peg adjustments are much much harder on the hands than arrow peg adjustments.  As arthritis worsens I can see this becoming impossible.  For now, it is the smartest way to do it so I'll just be glad it's not an extraordinarily frequent job.


I ended up creating a hybrid draft for the project, basically to see how much it was going to bother me to treadle network on the new loom.  Short answer, a fair bit.  The treadles do shift sideways enough to be a little irritating and my ankles got a few bruises.


Here it is all tied up!  I left the middle 2, rather than the outer 2, untied to hopefully help me keep track of treadles better.  I may still go back and number them with masking tape, we will see!

I discovered when I got under there, that the treadles have 10 holes.  Strange right?  I didn't get a definitive answer, but was told to tie up as close to centered under the shafts as possible, so the front and back holes aren't in use.  (A few people insisted they were for plainweave which at least I can be certain is not what they're for!)

The draft combination, a 3/1 network treadled twill.


And the finished towels!  They finished narrower than I thought and I realized after the project was done that the 12 dent reed I bought isn't a 12 dent, it's a metric reed that is closer to a 13.  It was pretty significant but knowledge is power and I'll not make that mistake again!  A new leclerc 12 dent is ready and waiting for next time.


Saturday, November 11, 2017

Loom up!

After a year of trying to figure out options that will keep me with two working looms for my shop, I finally decided on an Oxaback Lilla.  I knew I needed something versatile, but I wanted a small footprint so it could go along with us when we RV or settle in a skoolie as the kids get older.  Ultimately the option of a drawloom upgrade later sold me, although the aesthetics didn't hurt!  I was able to stop at the Woolgatherers in Fond du Lac on my way home from Rhinebeck this year, and got to weave on one of the Lillas set up in the store.  They're so traditionally beautiful!

Of course a snowstorm hit right after we got back, and we've had snow basically every day since.  After almost 2 weeks of this nonsense, I emailed them back and asked them to ship the loom.  It arrived Wednesday, and the next 24 hours were utter torture as we let the wood warm up, to prevent any odd expansion or contraction after assembly.

At any rate, Thursday brought us this!


The directions were unfortunately pretty difficult to understand, there are two pages of swedish instructions with a diagram, a page that is meant to be a translation, but only summarizes and refers back to the swedish.  It reminds me a bit of early English Lit classes, having to translate Beowulf and interpret at the same time, different bit of work for my weaving brain.  The slideshow is pictures after a bit is done, rather than how to do each step, but ultimately helped more than either set of written directions.  And we ended the day with the frame together, leaving me to do the pulleys and tie ups. This part is unfortunately more of a struggle, without clear instructions.  But I have a draft chosen, for the first piece, so I can set it up and configure it for my first weave in one step!


Tuesday, September 19, 2017

A better tablet weaving setup - with improved weights

Tablet weaving was one of my big 2017 goals, and all of the textile research I was looking at for SCA garb just made me need to start a.s.a.p.   Pi was generally horrified that I was willing to sacrifice perfectly good playing cards to learn a new weaving method, but I was determined to give it a shot without sinking a bunch of money into it first.  We were able to put together a simple tablet loom for $14, and had enough in supplies to make 2 little looms.  Hardware store door pulls, 2 boards from the $1 stack at ace, a dowel, and a little scrap wood from the garage.  J clamps, but I ended up not even using them. (Linden liked them though because they made the loom into his personal hoverboard)


My first run was fine, but with no border, the edges were really messy.  Fine for the boy to hold up his hip quiver though, so he quickly snatched it up.  It helped that he adores red.


I quickly learned the value of independent weights though.  I'd seen suggestions for ceramic inserts as weights and figured that might work well, so I ordered some.  It came in a 10 pack so I tied 2 cards per weight.  I picked (rather Carl picked, and I didn't know any better) the "dragon's head" popular pattern for my second attempt and was in over my head pretty fast.

Once I figured out that the pattern threaded backwards from what I'd seen elsewhere, I started plodding along, but the twist became a problem FAST.  Even with only 2 cards per weight, it was messy.  I spent 3 evenings cursing and browsing Amazon while I wove, untangled, wove, cursed, and untangled.

I finally came up with a system, and I like it.  For twist neutral patterns, I probably won't bother with it, I'll backstrap it or tie on a dumbbell and call it good!  For chaotic ones like this one has been, this was a lifesaver.


This is what it looks like.  The weights are 3 oz fishing weights, I got a package of 26 from Amazon.  I love that they're so narrow I can put on quite a lot of them and they stay pretty stable and line up easily without trying to tangle.

The part that took me forever to figure out though, was how to wind up my warp and keep it attached to the weights.  I contemplated and shopped for what felt like ages trying to find something workable.  I stumbled across these keyfobs that swivel and realized that would be perfect for letting out twist!  I got these embroidery floss bobbins and attached them all together. 

The hardest part was getting the fob through the hole in the weight, but it did fit with a little wiggling.
It's not perfect, but for a second tablet weave, I'm really happy with it.  It's definitely improving with each pattern repeat too.


Tuesday, August 22, 2017

Another branch of the rabbit hole - Viking garb

Historical textiles has been of major interest to me for many years so when we found a local SCA and Carl agreed to actually go to a meeting, I was overjoyed and overwhelmed!  Over the last couple of months we've been getting more involved and I've been slowly chipping away on our garb.

For our basic starter sets, I ordered 10 yards of essex linen blend from Dharma Trading Co. not really knowing what to expect.  It came and it's really lovely!  Sturdier than I expected and not scratchy, but nice drape.  I started with my under dress and Carl's tunic, since they're pieced pretty much identically, just changed the measurements.

I pulled heavily for starting measurements from this website which has a pretty good calculator, with a few things that didn't make a lot of sense for us.  I definitely felt like I needed to widen the neckhole a little, to avoid choking or having a split down to my belly button, and would have liked a tiny bit more ease in the sleeves (I think a product of narrow but long arms.

But ultimately I was able to lay out the pieces and it all made sense!


For the gores, I used a string and treated it like a compass in childhood, to make a curve.


I made 2 in this way and cut them in half to have to in the sides, one front, one back.


So far, so good!  The underarm gussets were the most confusing to place, I think actually laying it out flat and pinning so I could envision everything before I got near the machine REALLY helped.  So it's not 100% complete but my underdress/chemise or "serk" is basically ready, on to the overdress or smokkr.